
How to Set Up Cloudflare to Cache WordPress Pages
If you’re interested about adding Cloudflare to your WordPress site, make sure to read our complete guide about Cloudflare and WordPress!
By default, Cloudflare caches static assets such as stylesheets, images and scripts.
But not everyone is aware that it can also cache your entire website, if requested. That’s right: just like a regular caching plugin.
What’s more, pages that are cached in this way are then served from the Cloudflare network. This means your site could get a terrific response time, regardless of where visitors are located.
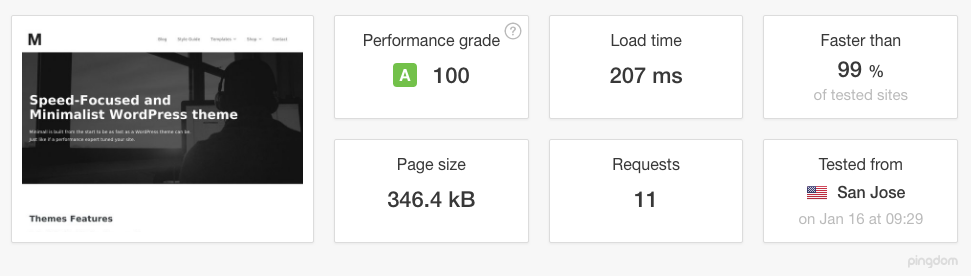
Pretty impressive results!
Some of you might argue that a 389 ms page speed is already fast enough. This isn’t untrue but it is missing the point.
Enabling page caching reduces the wait (TTFB) for a page to load. By decreasing the load time with every request, you can get an impressive reduction in the final page speed.
Just look at the 182 ms difference between the two above examples—and that’s for only six requests. Imagine what it can do on a bloated site with dozens of requests. Each request that’s delivered a bit faster reduces the global load time.
Quick setup
Set a page rule, as shown below, and you’re ready to go.
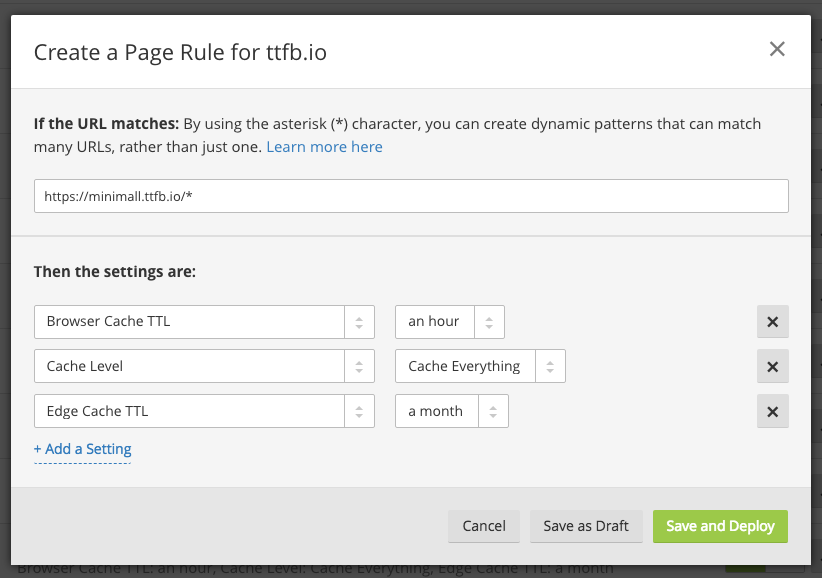
Let’s take a closer look at the above screenshot.
- Add your site URL with an asterisk at the end. This tells Cloudflare to apply the rule to your entire site.
- Set the Browser Cache TTL to an hour. This will minimise the risk to your visitors of keeping an outdated version of your site in the cache.
- Set the Cache Level to “Cache Everything.”
- Finally, set the Edge Cache TTL to a month. Your page will then be cached on Cloudflare’s servers for a month.
But, there’s a catch:
While this could drastically speed up your pages, it might not fit your site’s needs.
Unless you’re paying for an Enterprise Plan, there’s no way to exclude logged-in users. This means that everyone will see the same content.
If that just made you realize that Cloudflare page cache is not for you, don’t worry. You can still use it for specific purposes like a landing page, your homepage or even just your blog section.
Remember that you can control where rules apply, by specifying an URL. But you are restricted by your plan’s page rules limit. This is only 3 on the free plan, and 20 on the pro plan.

Testing Cloudflare page cache
To find out whether Cloudflare page cache is active, check your site’s headers. The easiest way to do this is to open your browser’s developer tool. Option + Command + i for Mac and F12 for Windows.
- Open the developer tool
- Navigate to the Network tab
- Refresh the page
- Click on the root request
Look for the header cf-cache-status. If it’s working correctly, the header should be set to HIT.
Install the Cloudflare plugin
Though I recommend that all Cloudflare-powered sites install the Cloudflare plugin, it’s especially useful when Cloudflare is caching HTML.
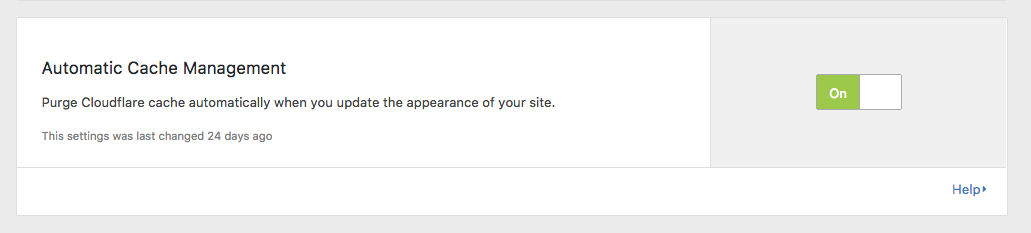
This is because the plugin allows you to activate the automatic cache management option. That way, every time you publish a new page or post, the plugin will clear the cache for you. Read the tutorial for more information.
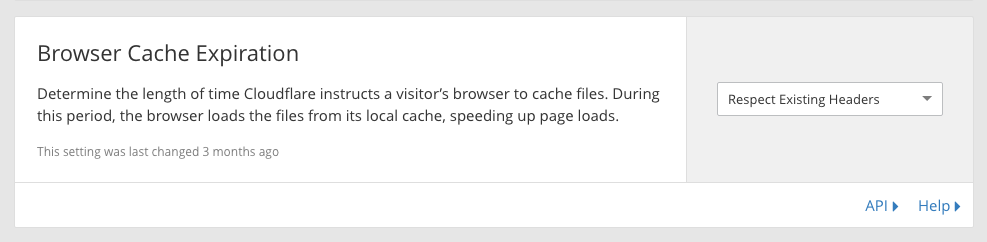
Set the browser cache expiration
For best results, set the Cloudflare Browser Cache Expiration setting to Respecting Existing Headers. The setting is located under the Caching tab.
Exclude the WordPress admin
By setting the Browser Cache Expiration to respect existing headers, you shouldn’t have a problem with the WordPress administration. However, I always set up the following rules when there are page rules left.
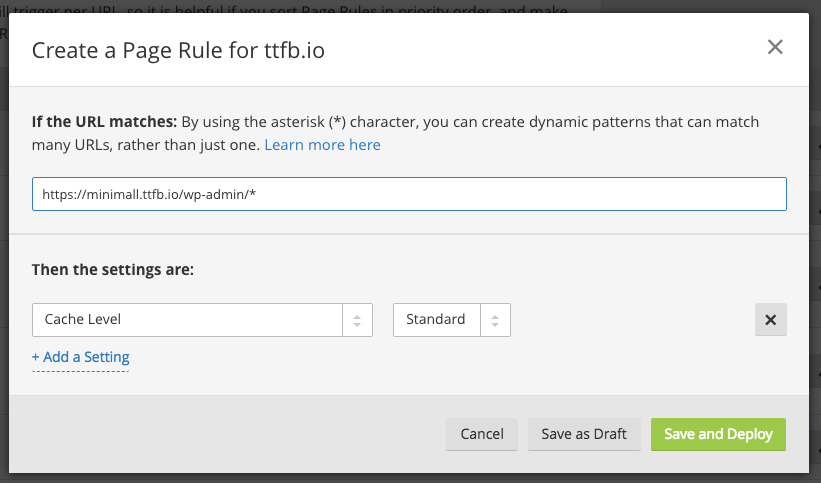
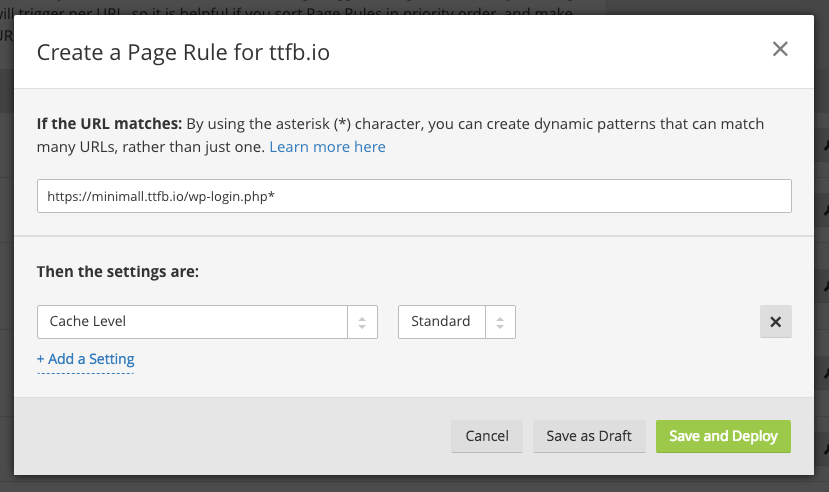
That way, you’re sure not to have backend issues.
Add these rules before the “Cache Everything” rule. Cloudflare’s page rules priority goes from bottom to top—the highest is the most important.
WordPress admin bar
This is where it might get frustrating.
If you don’t want the WordPress admin bar to be visible to everyone, I recommend disabling it completely in your user profile.
Otherwise, your visitors could see something like this:
WordPress comments
Here’s another problem: the WordPress commenting system doesn’t work with Cloudflare page cache.
Well, it does work, but new comments will not display unless you clear the page cache.
Here are 2 solutions:
- You don’t need the comment module anyway.
- Set up a third-party commenting system like Disqus or Facebook comments.
Cloudflare Enterprise Plan
Of course, you can always subscribe to the Cloudflare Enterprise Plan to make sure you don’t have any trouble with connected users.
With the Enterprise Plan, add a Bypass Cache on Cookie setting to the “Cache Everything” rule.
Conclusion
Though caching your WordPress pages on Cloudflare is not a piece of cake, it’s definitely worth the effort for speeding up your websites. Feel free to ask your questions or share your opinions in the comments bellow!
Further reading: